Here Is How To Hide Google Photos In Locked Folder
At the weekend, Google released an important function for Google Photos for all Android devices: “Locked folders” was previously a pixel-exclusive function with which you can save sensitive images in a separate folder.
If you’re like me, your smartphone is an integral part of your life. It would take a lot of WD-40 to snatch it from my hands. It is therefore obvious that the convenience of the smartphone comes with an inevitable risk to our privacy.
If you break a sweat every time someone browses your gallery, you will know exactly what I mean. Google Photos is also a real security risk. Because after the setup, every picture you take is usually saved in the photo cloud. There is also a much simpler and more immediate threat: the prying eyes of strangers. In this guide, we will explain how the locked folder works and how to set it up on Android smartphones.
Maybe you just want to entrust your device to someone else for a short time or post on social media while on the go. But as soon as the preview of your galleries opens, you will regret it. All of your weird memes – or worse – are in the eyes of people who shouldn’t be.
Google is now solving this problem by bringing the Pixel-exclusive feature to all Android smartphones. The locked folder is a secure folder on your device that keeps your private photos away from the cloud, from image previews from other apps, and, above all, from people who greedily leaf through your galleries.
Requirements for using these instructions: Any Android device with Android 6 or higher and of course the official Google Photos app.
Set up the secure folder in Google Photos
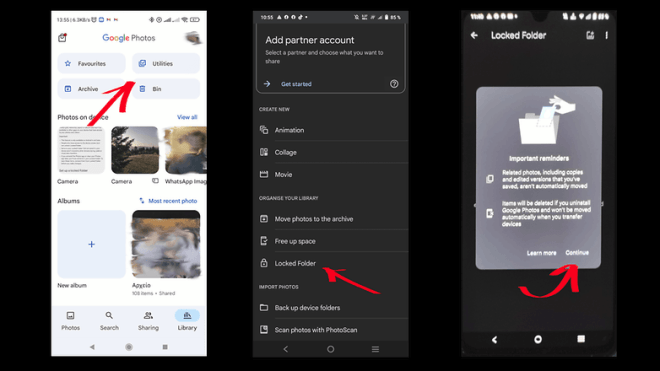
Setting up a secure folder is a simple process. You open the Google Photos app and …
- Navigate to Gallery> Manage> Scrolls down to Locked Folders
- Click on Set up locked folder
- Activates the folder via fingerprint or password
Then you will be shown some basic information about the service. After you’ve read them, click Continue, and you can add images to your secure folder.
Add pictures to your locked Google Photos folder
Adding images to the Secure Locked Folder is pretty straightforward in itself, but there are a few things to keep in mind. The images that you can transfer to the folder must first be in the cloud. So you can only select photos from synced folders. Pictures from the Recycle Bin must first be restored before they can be moved to the locked folder.
After you’ve uploaded your photos to the cloud, navigate to Gallery> Manage> Locked Folder> Move Items. You can then select the images you want. Either tap them individually or select a whole day by tapping on the circle in the top left. You can also search for individual photos.
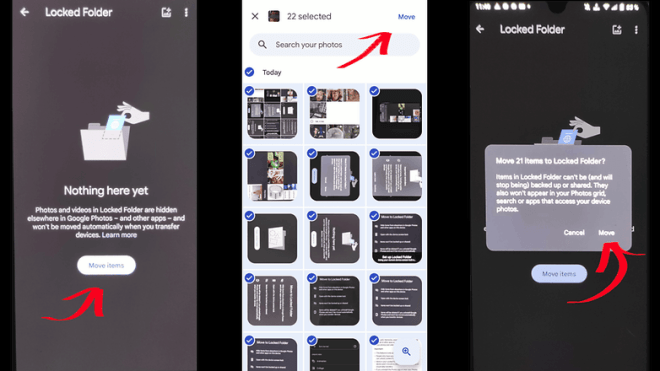
Now you tap on Move, make sure that you have read the request, and click on Next> Move> Allow. Then you have to wait for the process to complete. This can take a while, and your device may ask you to unlock it again if you don’t interact with the screen for too long. Don’t worry, the process will continue in the background.
To move an image to the cloud again, select it and click Move Items. After you’ve read the prompt, click on Move again and wait for the process to complete.
Caution! If your photos are deleted from the locked folder, they will be permanently deleted from the device and will NOT be moved to the Google Photos folder.
Stored Photos?
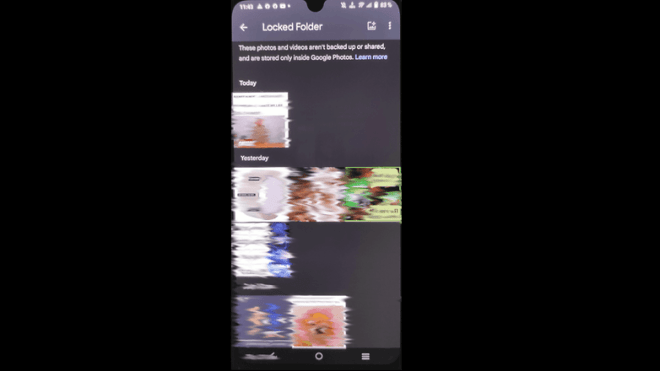
The Google Photos app transfers your photos from the cloud to a secure folder on your device. Then the pictures are deleted from your cloud, which means that your protected pictures are only accessible via the Google Photos app on the device. Other apps cannot see these images, and you will need to navigate through the secure folder to view them.
To view your locked folder, navigate to Gallery> Manage> Scroll down to Locked Folder.
To access the locked folder, you will then have to use your fingerprint or your screen lock password again. Anyone who knows the combination of your screen lock can also access this folder. It should also be noted that these images will be lost if you delete the application or reset the smartphone to the factory settings. In addition, these images are not automatically copied to a new device when you migrate the data. To do this, you would have to move them manually from the folder to the cloud and set up the folder on the new device.
Research Snipers is currently covering all technology news including Google, Apple, Android, Xiaomi, Huawei, Samsung News, and More. Research Snipers has decade of experience in breaking technology news, covering latest trends in tech news, and recent developments.